ZX Spectrum 48K Recommissioning
Bringing my Sinclair ZX Spectrum 48K back to life after 30 years.
History
My recollection is that I bought my Sinclair ZX Spectrum 48K with the proceeds of a Summer job in 1983. I used it to program (Basic and Z80 assembly) and play games.
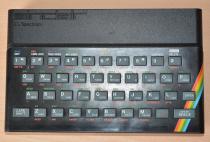
I used it while studying at University, but it fell into disuse when I started using and contributing to Linux in 1993.
Much Later
Occasionally I would contemplate turning on the ZX Spectrum for a bit of nostalgia.
In October 2019, I saw a tweet from a friend who had fixed an old BBC, part of which involved replacing the old electrolytic capacitors.
A later conversation confirmed that replacing the capacitors would be necessary, so in February 2020 I ordered and received a kit of replacement capacitors.
It was great to have someone else source the axial capacitors required. The kit came with a set of clear instructions. It had two bonus packages - components for the DC-DC converter mod, and components for converting the video outpur from RF to composite output.

I added a solder sucker, de-soldering tape, and some other accessories to my soldering kit. I was ready to go!
Soon.
Even Later
It was finally October 2023 that I decided to take the plunge. I had watched some videos on troubleshooting and repairs, so it was time to get started.
The ZX Spectrum had been stored in my loft for the last 20 years. I know that the temperature ranges are quite large. My fear was the 40 year old components wouldn’t have survived the ordeal.
Capacitor Replacement
I bought the box down from the loft, and opened it up.
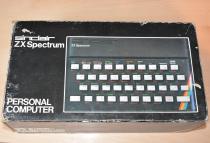
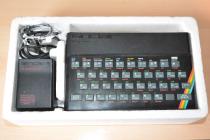
There were signs of the box being exposed to high temperatures. The black cables (power, audio, video) had become warm enough to melt into the polystyrene. Not the best of signs.
I did find some interesting stickers. The power supply had been checked since the recall of February 1983 (must have been been supplied like that). The ZX Spectrum had the warranty sticker from a repair I had carried out in 1988.
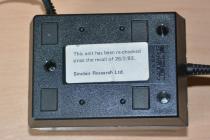
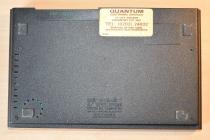
I had to void the repair warranty by removing the sticker to open the case. One of the keyboard membrane connectors had fractured, leaving just one to pull out to separate the case top. The motherboard was removed from the lower case once I’d found the single screw to undo.
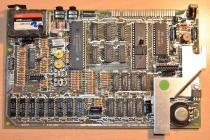
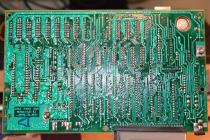
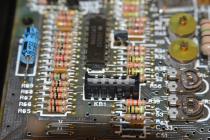
I then went through replacing the 10 capacitors on the motherboard. Replacing components isn’t something I’ve done before, but I soon got into the rhythm of unsoldering the old capacitor, clearing the holes, and fitting the replacement.
For some of the harder to reach capacitors, I snipped off a leg so I could grab the body to pull, and used pliers for the remaining leg.
My motherboard had already had the DC-DC modification made, so it was just a case of replacing that capacitor.
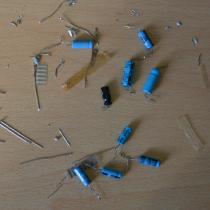
Fortunately, the new capacitors were a different colour, simplifying the task of keeping track.
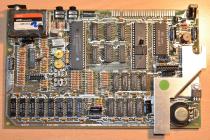
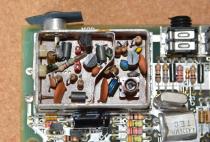
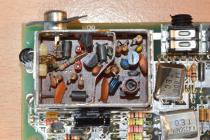
I decided to make the conversion to composite output, as it just required removing the power, input, and output from the RF modulator, and by-passing with a capacitor.
Power On
I performed a basic verification of the power supply. It didn’t smoke when plugged in, but the output voltage seemed high at 12V. Research suggested this was fine for the unregulated supply with no load.
It was time to connect to a TV and power it up!
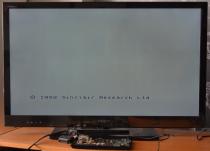
I was so pleased to see the © 1982 Sinclair Research Ltd message.
The next step was to try connecting the keyboard. As it was all I had, and there were no signs of cracking, I trimmed the ends, and plugged it in.
It nearly worked. There was one non-functioning trace. As it affected the keys down the far left and right, I had no “Enter” key. No commands could be entered.
Time to do some shopping.
Keyboard and Voltage Regulator
A quick online shop later, and a replacement keyboard membrane and voltage regulator were in my hands within the week.
The keyboard membrane is easily fitted, as the adhesive tape holding on the metal plate has almost completely degraded.
The voltage regulator was to deal with the heat generated by the existing 7805. This is why there is such a large heatsink. Fitting a more efficient switch mode regulator removes the need to have the heatsink, and removes the risk of baking the two adjacent capacitors.
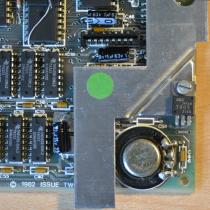
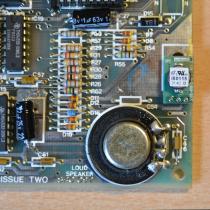
The operation was a success. All of the keys are functioning.
Verification
I knew that displaying the copyright message was not an exhaustive test of the ZX Spectrum. Would I have faulty memory, ULA, or something else?
The plan was to load a game off a cassette.
I fetched my reliable Triumph CR1610 cassette recorder down from the loft, and tracked down my box of ZX Spectrum cassettes (which had escaped the loft). I plugged in the audio cable. I selected The Hobbit. This is a 48K game, so would test both the upper and lower memory.
I pressed play. Nothing happened. The cassette recorder was completely dead.
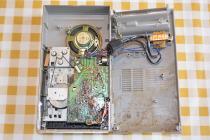
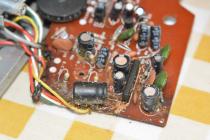
Upon opening the case, I was greeted with strange deposits and furry capacitors. I don’t know if this is even repairable.
I then tracked down my cassette player with a USB interface (in the Walkman form factor). I wasn’t able to load from the player, but the following approach worked:
- Make a mono recording of the cassette using Audacity
- Use “compression” to increase the volume of the recording
- Play from Computer into ZX Spectrum
- Use stereo leads, not the ZX Spectrum’s mono leads
- Set balance all the way over to the right
- Increase Audacity’s output by 13db
- Have “over-amplification” enabled, and line out volume at maximum.
The key piece of information is you should be able to hear the audio through the ZX Spectrum speaker.
With all volume knobs turned up to 11, I got the loading screen.
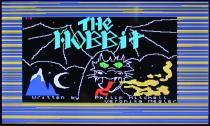
The loading continued for about 5 minutes, and finally I had my first ZX Spectrum game loaded for 30 years.
I played for a little while, got eaten by trolls a few times, and didn’t progress beyond 2.5% of the adventure. I also forgotten how annoying Thorin was. “Thorin sits down and starts singing about gold”.
I think this means that the memory is not completely broken, and the ULA is not fatally unhappy. I declare the ZX Spectrum to be alive!
Memory Diagnostics
I had read about diagnostic ROMs that can be used to diagnose ZX Spectrum memory, and found a tape version of the ZX Spectrum Diagnostics.
I now needed to work out how to play the TAP files on Linux (and also TZX).
I found tzxtools, which were written for Linux in Python. Perfect.
I found I had to get tzxplay to generate soft sine pulses (-S) rather than
square waves, but with the (overamplified) output set to the maximum level, the
diagnositics loaded.
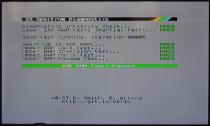
More importantly, the diagnostics passed.
Tape Recovery
Knowing that I could play a TZX and TAP files reliably, it was time to investigate converting tapes into TZX files.
I used Audacity to record from the USB tape player, and
then exported the audio as WAV. I then used tzxwav (selecting the right
audio channel).
$ tzxwav -v -S right zzoom.wav -o zzoom.tzx
0:12.352    544729 -    763160: Program: ZZOOM      (200 bytes)
0:18.275    805958 -    936931: 200 bytes of data
0:27.302   1204053 -   1422579: Bytes: 0          (start: 24577, 22300 bytes)
0:33.212   1464667 -   6711471: 22300 bytes of data
2:34.138   6797512 -   7015975: Bytes: 1          (start: 23728, 2 bytes)
2:40.049   7058194 -   7145000: 2 bytes of data
2:43.305   7201754 -   7420579: Bytes: 2          (start: 23672, 3 bytes)
2:49.226   7462900 -   7550044: 3 bytes of data
I had mixed results. Clearly some of the tapes were of a better quality, and
the output was cleaner. Other recordings were so poor, nothing was extracted,
or reported CRC errors (future R Tape loading error).
$ tzxwav -v -S right -o vu-file.tzx vu-file.wav
  0:16.227    715646 -    933119: Program: vu-file    (40 bytes)
  0:22.126    975786 -   1070600: 40 bytes of data, CRC ERROR!
  0:26.283   1159103 -   1376631: 16 bytes of bogus header, CRC ERROR!
  0:32.183   1419313 -   1520287: 68 bytes of data, CRC ERROR!
  0:39.136   1725940 -   1942477: 13 bytes of bogus header, CRC ERROR!
  0:45.013   1985093 -   2347061: 1409 bytes of data, CRC ERROR!
  1:18.261   3451317 -   3668852: 16 bytes of bogus header, CRC ERROR!
  1:24.150   3711030 -   3798171: 4 bytes of data, CRC ERROR!
I did find that although some recordings didn’t convert with the default settings, choosing a high tolerance to tape flutter successfully extracted it.
$ tzxwav -v -S right -o vu-file.tzx vu-file.wav -T high
  0:16.227    715646 -    933151: Program: vu-file    (40 bytes)
  0:22.126    975786 -   1070600: 40 bytes of data
  0:26.283   1159103 -   1376663: Program: VU-FILE    (648 bytes)
  0:32.183   1419313 -   1653118: 648 bytes of data
  0:39.136   1725940 -   1943182: Screen: T
  0:45.011   1985017 -   3374424: 6912 bytes of data
  1:18.261   3451317 -   3668883: Bytes: C          (start: 25088, 5640 bytes)
  1:24.150   3711030 -   5160056: 5640 bytes of data
With a copy of VU-File I was able to load my address book, and view the 25 entries. I think one of them was the person who employed me for the Summer job that bought the ZX Spectrum.
Thanks
This would not have been possible without all of the ZX Spectrum enthusiasts who have shared information on the working and repair of this computer, provided utilities, and those that are still selling the parts 40 years later.
I bought parts from Retroleum because it happened to be their capacitor kit I bought off eBay in 2020. My impression is there are many other good sellers providing support and spares.